

One of the projects we’ve wanted to tackle this off-season is the wiring on Pegu Club. The plan was to replace all the wiring and upgrade the original panel which had fuses, to a breaker panel. We were originally going to do this before we went on vacation in September, but then thought better of it and decided to wait until we weren’t pressed for time. Smart choice.
Electrical work is our achilles heel – well, that and engine work. We don’t know much about it, and although we have plenty of reference materials they never seem to answer the exact question that we have. If there was a book called “12 volt Electrical Work for Dummies” it would be too complicated for us. With Pegu Club out of the water, however, there was no time like the present.
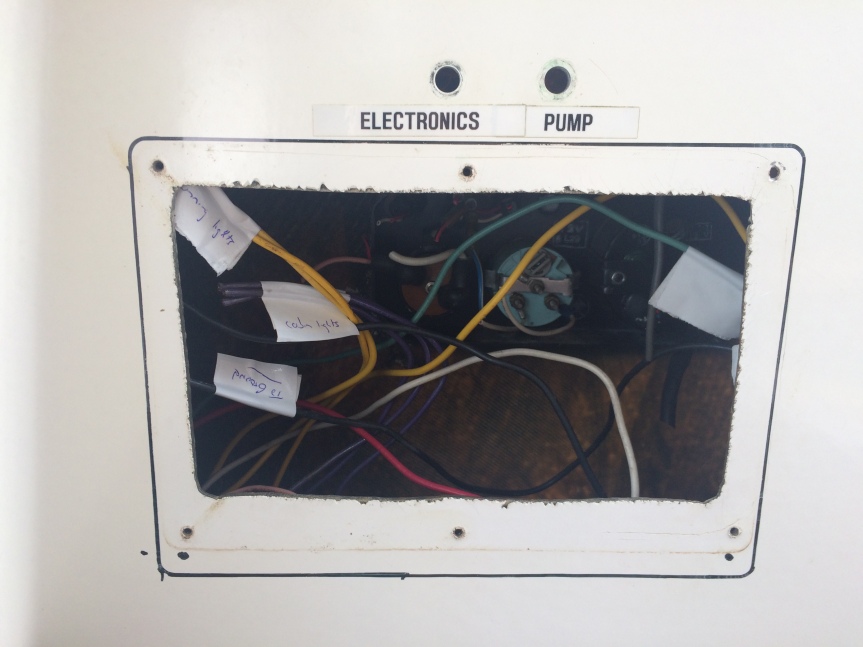
The first thing we did (after disconnecting the batteries of course – we may not know much, but we have some common sense) was to remove the old panel and cut the wires off of it. We labeled them as we cut them (see, there’s that common sense thing again), and noticed that we had more positive wires than negatives which didn’t make any sense to us. We weren’t surprised, however, given the comment Mike (one of our Shenny friends) had when he saw how Pegu Club was wired. Mike knows all things electric inside and out. When we showed him the back of our old panel and asked for some tips, his first comment was, “Oh my god.” Yes, this was going to go well. We decided to worry about the positive and negative wire count later, and pressed on.
Next up was replacing the wire for the interior cabin lights. We tried and tried but the old wire was definitely not coming out. I asked for some advice on the Bristol Facebook page and discovered that Bristol used copper staples in some areas to hold the wiring in place. Hmmm. No wonder we couldn’t get it out. Someone suggested that we simply leave it alone if the wire was in good shape, particularly since we had switched to LED bulbs so the draw was minimal. We thought about that, and also spent some time debating whether we should just cut the old wires and run new ones in a different place. Ultimately, since the wiring didn’t show any signs of corrosion we decided to stick with what we had. The wire nuts were going to have to go, however.


Before (with wire nuts) and after (with proper heat shrink connectors).
After replacing the wire nuts on all seven interior lights with proper, heat shrink connectors, we moved on to installing the cabin fans. Fans aren’t particularly necessary here in Connecticut, but we know we’ll definitely want them when we’re in the Caribbean. We had managed to score three of them for $80 at the consignment store in Newport (normally they are $80/each), so it was time to install two in the main cabin and the third in the v-berth.
We measured the round-trip length of the run to determine what gauge wire we needed, made a trip to West Marine to buy the wire, and got to work. All was going well until it was time to connect the new wire with the existing fan wire. The fan wire was much smaller than the new wire. How were we going to get around that? A quick search on Google led us to the discovery of step-down connectors which can be used when trying to connect two different wire sizes. Who knew? Obviously not us! Unfortunately, West Marine didn’t have any but Amazon did. One week later, we were back on the boat wiring the fans.


One in the v-berth (we’re going to buy a second one) and two in the main cabin.
Once the fans were finished we turned our attention to installing the new panel. Since we needed a larger hole, we drew the outline with the provided template and then Jeff used the Dremel to cut it out.
The new panel is a bit larger than the original.
Now it was finally time to start connecting the wires to the new panel. Since we weren’t sure which negatives went with what, we brought our small battery that we had purchased a few years ago when we were testing the mast lights.

We matched up what we could, and now we think the one negative works for all of the mast lights. We’re going to have to try to trace it to be certain though. After connecting the interior lights, the compass light, and the running lights to the new breaker panel, we wanted to connect the fans. It was at that point that we realized we had three positive and negative wires (soon to be four when we buy the fourth fan). Could we hook them all onto one post? Should we use a bus bar? We were stalled again. Time to call it a day and do some research during the week. I recognize this is obviously a very basic issue that anyone with experience wouldn’t have to think twice about, but we really are novices and are trying to make sure we do it right.
Once we figure out what to do with the fans, all that we’ll have left is to rewire the mast lights and install the new VHF, chartplotter, B&G instrument panel, USB charger, and tricolor light. Then we’ll be finished with the electrical work. Phew!
If we can pull this off, I think we’ll be able to say that we aren’t total novices when it comes to electrical work anymore. We’re also planning to ask Mike, the expert electrical guy, to take a look at what we’ve done when we get back to Shenny so we can make sure we’re not going to accidentally set the boat on fire!

My heavens. What a serious job. Pego is going to look so spiffy and run spiffy as well. Good for you both, Love,Nikki
LikeLiked by 1 person
Thanks, Nikki. We’re learning a lot. Love you!
LikeLike
Hire an electrician!!! It will be money well spent.
LikeLiked by 1 person
But then we still won’t know what we’re doing! 🙂 We’ll DIY and have our friends check it out.
LikeLike
Bus bar for your grounds will make everything much cleaner / easier.
LikeLiked by 1 person
Definitely – thanks!
LikeLike